
Mold Remediation is removing and cleaning up areas infected with mold. It also involves fixing the moisture issue that caused the mold to grow in the first place. Contact One Of A Kind Restoration for professional help.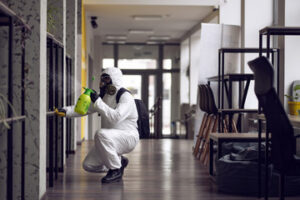
Porous building materials like drywall and carpeting must be removed from the area. They’re bagged and wiped down to eliminate spores before disposal.
When mold spores are detected in an area, it is important to document it before beginning work. A trained mold remediation specialist will take pictures and videos of the affected areas. They will then determine the level of contamination and create a plan to remove it. This step also includes assessing any potential structural damage caused by the spores.
Once the plan is in place, the professionals will spray a biocide, an EPA-approved substance that eradicates mold and prevents it from spreading. They will also disinfect surfaces that cannot be removed, such as wood floors or carpeting. Then, they will use HEPA-approved vacuums to remove moisture and spores from all surfaces. After a thorough cleaning, the professional will whitewash or apply a special paint to prevent new spores from growing in the future.
Remediation should only occur when building occupants are not living or working in the affected areas. Remediators must wear protective gear when assessing or working in areas with high levels of contamination. While guidelines suggest specific personal protection levels for different areas, a remediation manager may need to adapt these guidelines based on their own experience and the specific circumstances of a particular situation.
During this process, the professionals will isolate the contaminated area to limit cross-contamination. They will also check to see if there is any water or moisture infiltration, which is a common cause of mold growth. If they find any problems, they will work to fix them immediately to avoid a recurrence of the mold infestation.
After the mold has been removed, the professional will test the air and surface of the remediated area to ensure that it is safe for occupancy. They will compare the results to a control sample taken from an unaffected area, as well as pre-remediation samples if available.
This post-remediation verification (PRV) testing is essential to prove that the mold infestation has been eliminated. It also helps to establish that the remediated area is within acceptable limits, which is helpful for insurance claims or legal compliance. A PRV is often done by a third party, which can help to guarantee that the results are accurate and unbiased.
Cleaning
The mold remediation process includes cleaning, disinfecting and applying antimicrobial solutions. Professionals use cleaning solutions that are formulated to kill mold and are safe for indoor use. To avoid spreading mold spores to other areas, they isolate the infected area using plastic sheets and close doors and windows. They mist contaminated surfaces to control airborne spores, and they dispose of wet and mold-contaminated materials in sealed plastic bags.
The first step of cleaning involves scrubbing hard surfaces with a cleanser. Standard household white vinegar is effective at killing mold and mildew on surfaces such as wood, tile or glass. It’s best to wear PPE (personal protective equipment) such as a mask, rubber gloves and safety goggles when scrubbing moldy areas. The vinegar must soak into the affected surface for a few hours before wiping or rinsing.
Ammonia can be used to kill mold on non-porous surfaces such as countertops, tile or glass. It’s important to always follow a product’s label instructions when using any cleaner and never mix bleach with ammonia. Ammonia can be very toxic and should only be used in the presence of a professional.
In some cases, the mold may be behind walls or under sink cabinets and not visible to the naked eye. These areas need special attention, as the hidden mold can spread quickly. Professionals can use a moisture meter to locate the source of the problem, which might be a leaky pipe or a sagging floor. The professional can then fix the problem to prevent future mold growth and make sure that the affected area is completely dry.
When the infected area is isolated and cleaned, the mold remediation technician can apply an antimicrobial solution to large surfaces like walls and floors. They can also spray the affected area with a biocide, an EPA-approved liquid that kills mold and other fungi. This step may take several days to allow the solution to kill mold spores and dry the area.
Once the contaminated area is cleaned and treated, a specialized coating can be applied to the affected area to encapsulate it. This protects the area from new mold and allows for a fresh coat of paint or wallpaper to be installed over it.
Removal
During the removal process, any porous items like carpeting, clothing, wallpaper and fabric-covered furniture are removed from the affected area. These items will be bagged and disposed of according to EPA standards. Non-porous materials can remain, but they will likely be sanitized to eliminate mold spores.
Technicians also clean and disinfect all surfaces in the affected room including drywall, wood trim, windows, door frames and baseboards. They can also spray biocide, which is an EPA-approved substance that kills mold spores and renders them sterile. This prevents the spread of any new mold growth.
Then, they isolate the contaminated space by closing all doors and windows between the affected area and other rooms. For Level 2 remediation, they will also cover all openings with 6mm polyethylene sheeting and duct tape the seams to create a seal. This is done to prevent the movement of mold spores and mycotoxins from the contaminated room into other areas.
Next, they will use fans and dehumidifiers to dry the affected room. They will also check to see if there are any leaks in the walls or ceilings that need to be repaired before proceeding with the rest of the project.
Once the contaminated areas are completely dry, they will sanitize all surfaces. They may use a high-powered jet spray or a scrubber to get deep into the cracks and crevices of the surface. After the surfaces are sanitized, they can be painted with a mildewcide to prevent future outbreaks of mold.
Lastly, they will test the air quality and clear it for mycotoxins and spores. Once the area is cleared, they can begin rebuilding the structure with appropriate materials. This is the most time-consuming part of the entire process, but it’s essential to ensuring that the mold infestation is totally eradicated. It’s best to leave this step to the professionals so that you can be sure the problem won’t return. During this phase, the remediation company will also replace any material that is destroyed during the cleaning and removal processes. They’ll also make arrangements to transport any hazardous waste.
Post-Remediation Inspection
A post-remediation inspection, sometimes called a clearance test, is the final step in the mold remediation process. This inspection, which should be conducted no later than 24 hours and preferably 48 hours after the treatment is complete and windows and doors should remain closed, includes a visual inspection and moisture assessment along with air quality testing.
The mold inspector will use a moisture meter and infrared camera to measure the amount of humidity and moisture present within the building materials of the remediated area, to ensure the levels are back to normal. The inspector will also collect air and surface samples from the remediated area to analyze the concentration of mold spores. These spores will be compared to the base control sample and to the pre-remediation samples (if available) in order to determine if the mold spore levels have been successfully reduced to acceptable levels.
If the post-remediation inspection confirms that the mold spore levels are now lower than the pre-remediation sample and that the original remediation protocol was followed, the inspection company will issue a Passed Clearance Report to the client. This report can then be used to satisfy disclosure requirements for a real estate transaction or to demonstrate that the underlying cause of the original mold problem has been resolved.
It is recommended that the post-remediation inspection be performed by the same inspection and testing company that originally performed the original mold inspection. This helps to ensure that the same methods are used for both inspections, which will result in a more accurate comparison between the before and after mold spore levels.
A post-remediation inspection is an essential part of the mold remediation process. This important inspection will not only help to verify that the mold removal and cleanup was done properly, but it will also provide peace of mind that your home or office is once again safe for re-occupancy. In addition, a post-remediation inspection can be used to show proof of the original mold inspection and remediation to an insurance company in the event of a claim.